■ gridstack.js에서 2개의 grid간에 서로 Drag & Drop하는 기능을 필요에 따라 수정했다.
■ 참고
- http://gridstackjs.com/ – homepage & demo
- gridstack 유형별 데모
- gridstack.js API
- gridstack.js angular version
- https://github.com/gridstack/gridstack.js – github 소스 다운로드
■ gridstack은 drag & drop을 할 수 있는 객체를 widget이라고 하고, widget을 움직일 수 있는 바탕을 grid라고 정의한다.
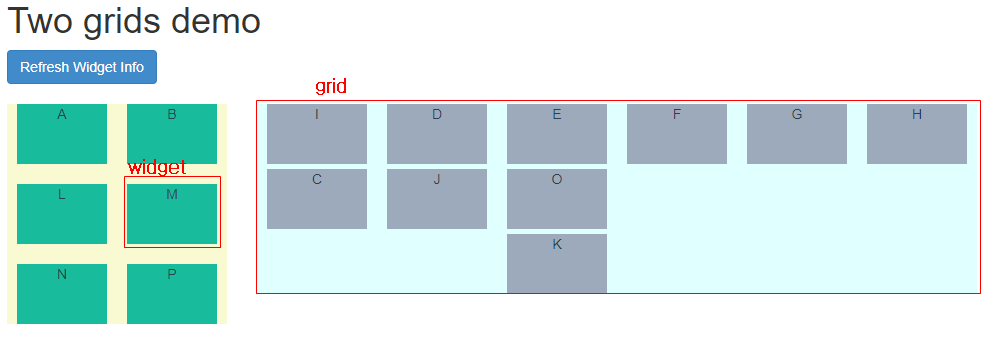
■ gridstack에서 grid의 위치를 정의한다. row, col-md-2, col-md-6은 bootstrap 스타일이다. grid-stack은 gridstack임을 표시하고 grid-stack-2는 widget이 최대 2칸이 들어감을 표시, grid-stack-6은 widget이 최대 6칸이 들어갈 수 있음을 표시한다.
<div class="row">
    <div class="col-md-2">
        <div class="grid-stack grid-stack-2" id="grid1"></div>
    </div>
    <div class="col-md-6">
        <div class="grid-stack grid-stack-6" id="grid2"></div>
    </div>
</div>
■ 표시될 grid의 옵션. 다양한 option이 있으며 API에서 확인 가능하다.
width는 최소단위의 widget이 들어갈 수 있는 개수라고 생각하면 된다.
float 속성이 false이면 자동으로 위쪽으로 widget이 정렬이 되고 grid 크기도 widget에 맞게 조정된다. true이면 grid위에 drop된 위치 그대로 widget이 고정된다.
var options1 = {
    width: 2,//2칸
    float: false,
    acceptWidgets: '.grid-stack-item'
};

var options2 = {
    width: 6,   // 6칸
    float: true,
    removable: '.trash',
    removeTimeout: 100,
    acceptWidgets: '.grid-stack-item',
    horizontalMargin: 3,
    verticalMargin:5
};
■ gridstack 초기화 – 위에서 지정한 options1, option2를 가지고 gridstack을 초기화 하였다.
$('#grid1').gridstack(options1);
$('#grid2').gridstack($.extend({}, options2, {
    float: true
}));
■ grid에 그려줄 단위 widget들을 json 형식으로 정의한다.
x, y는 grid에서 widget이 위치할 좌표이다. 값은 자연수 형태로 지정하며 width, height는 각 widget의 크기이다. label은 widget에 표시할 목적으로 임의로 추가했다.
var items1 = [
    {id: 'A', x: 0, y: 0, width: 1, height: 1, label: 'A'},
    {id: 'B', x: 1, y: 0, width: 1, height: 1, label: 'B'},
    {id: 'L', x: 0, y: 1, width: 1, height: 1, label: 'L'},
    {id: 'M', x: 1, y: 1, width: 1, height: 1, label: 'M'},
    {id: 'N', x: 0, y: 2, width: 1, height: 1, label: 'N'},
    {id: 'O', x: 1, y: 2, width: 1, height: 1, label: 'O'},
    {id: 'P', x: 0, y: 3, width: 1, height: 1, label: 'P'}
];

var items2 = [
    {id: 'C', x: 0, y: 0, width: 1, height: 1, label: 'C'},
    {id: 'D', x: 1, y: 0, width: 1, height: 1, label: 'D'},
    {id: 'E', x: 2, y: 0, width: 1, height: 1, label: 'E'},
    {id: 'F', x: 3, y: 0, width: 1, height: 1, label: 'F'},
    {id: 'G', x: 4, y: 0, width: 1, height: 1, label: 'G'},
    {id: 'H', x: 5, y: 0, width: 1, height: 1, label: 'H'},
    {id: 'I', x: 0, y: 0, width: 1, height: 1, label: 'I'},
    {id: 'J', x: 1, y: 1, width: 1, height: 1, label: 'J'},
    {id: 'K', x: 2, y: 1, width: 1, height: 1, label: 'K'}
];
■ grid에 widget그리기
grid객체를 구한 후 addWidget함수를 이용해서 widget을 grid에 그려준다. 이 함수에 대한 상세한 설명은 역시 API를 참조한다.
var grid1 = $("#grid1").data('gridstack');
var grid2 = $("#grid2").data('gridstack');

items1.forEach(function (node) {
    grid1.addWidget($('<div><div class="grid-stack-item-content">'+node.label+'</div></div>'),
        node.x, node.y, node.width, node.height, false,1,3,1,3,node.id);
});

items2.forEach(function (node) {
    grid2.addWidget($('<div><div class="grid-stack-item-content">'+node.label+'</div></div>'),
        node.x, node.y, node.width, node.height, false,1,3,1,3,node.id);
});
■ grid에 그려진 widget정보를 확인하기 위해 Refresh Widget Info 버튼을 클릭하면 아래의 함수가 실행된다. 화면이 로딩될 때 그려진 widget은 $(“#grid1”).data(‘gridstack’).grid.nodes에서 widget의 ID가 확인 가능한데 drag & drop기능으로 grid간에 이동된 widget은 ID가 확인불가능하다. 이 경우는 item.el.data()함수를 이용해서 widget의 ID를 확인한다.
$("#showInfo").click(function() {


    var items1 = $("#grid1").data('gridstack').grid.nodes;
    var items2 = $("#grid2").data('gridstack').grid.nodes;

    console.log(">>> widgets ");
    items1.forEach(function(item){
        console.log(item);
        if( item.id ) {
            console.log(item.id +' '+item.x +' '+item.y +' '+item.width +' '+item.height);
        }
        else {
            itm = item.el.data();
            console.log(itm.gsId +' '+itm.gsX +' '+itm.gsY +' '+itm.gsWidth +' '+itm.gsHeight);
        }
    });

    console.log(">>> dashboards ");
    items2.forEach(function(item){
        console.log(item);
        if( item.id ) {
            console.log(item.id +' '+item.x +' '+item.y +' '+item.width +' '+item.height);
        }
        else {
            itm = item.el.data();
            console.log(itm.gsId +' '+itm.gsX +' '+itm.gsY +' '+itm.gsWidth +' '+itm.gsHeight);
        }
    });
});
■ gridstack widget에 클릭 이벤트 추가 – gridstack에서는 added, change, disable, dragstart등의 다양한 이벤트가 제공되고 있기는 하지만 widget에 대한 click이벤트는 없었다. widget은 화면이 로딩되고 난 후에 추가되기 때문에 jquery의 $(document).on(‘click’, ‘.grid-stack-item’, function() {…}); 함수를 이용해서 click이벤트를 구현했다.
$(document).on('click', '.grid-stack-item', function() {
    console.log('grid id : ' + $(this).parent().attr("id"));
    console.log('widget id : ' + $(this).attr("data-gs-id"));
});
■ 전체 소스 – 아래 소스내의 로컬로 링크된 css나 js파일들은 github에서 다운로드받은 파일중에서 찾을 수 있다.
<!DOCTYPE html>
<html lang="en">
<head>
<!--[if lt IE 9]>
<script src="http://html5shim.googlecode.com/svn/trunk/html5.js"></script>
<![endif]-->
<meta charset="utf-8">
<meta http-equiv="X-UA-Compatible" content="IE=edge">
<meta name="viewport" content="width=device-width, initial-scale=1">
<title>Two grids demo</title>
<link rel="stylesheet" href="https://maxcdn.bootstrapcdn.com/bootstrap/3.2.0/css/bootstrap.min.css">
<link rel="stylesheet" href="./css/gridstack.css"/>
<link rel="stylesheet" href="./css/gridstack-extra.css"/>
<script src="https://ajax.googleapis.com/ajax/libs/jquery/1.11.1/jquery.min.js"></script>
<script src="https://cdnjs.cloudflare.com/ajax/libs/jqueryui/1.11.0/jquery-ui.js"></script>
<script src="https://maxcdn.bootstrapcdn.com/bootstrap/3.2.0/js/bootstrap.min.js"></script>
<script src="https://cdnjs.cloudflare.com/ajax/libs/core-js/2.4.1/shim.min.js"></script>
<script src="./js/gridstack.js"></script>
<script src="./js/gridstack.jQueryUI.js"></script>
<style type="text/css">
#grid1 {
background: lightgoldenrodyellow;
}
#grid2 {
background: lightcyan;
}
.grid-stack-item-content {
color: #2c3e50;
text-align: center;
background-color: #18bc9c;
}
#grid2 .grid-stack-item-content {
background-color: #9caabc;
}
</style>
</head>
<body>
<div style="width:1500px">
<div class="container-fluid">
<h1>Two grids demo</h1>
<div>
<a id="showInfo" class="btn btn-primary" href="#">Refresh Widget Info</a>
</div>
<br>
<div class="row">
<div class="col-md-2">
<div class="grid-stack grid-stack-2" id="grid1"></div>
</div>
<div class="col-md-6">
<div class="grid-stack grid-stack-6" id="grid2"></div>
</div>
</div>
</div>
</div>
<script type="text/javascript">
$(function () {
var options1 = {
width: 2,//2칸
float: false,
acceptWidgets: '.grid-stack-item'
};
var options2 = {
width: 6, // 6칸
float: true,
removable: '.trash',
removeTimeout: 100,
acceptWidgets: '.grid-stack-item',
horizontalMargin: 3,
verticalMargin:5
};
$('#grid1').gridstack(options1);
$('#grid2').gridstack($.extend({}, options2, {
float: true
}));
var items1 = [
{id: 'A', x: 0, y: 0, width: 1, height: 1, label: 'A'},
{id: 'B', x: 1, y: 0, width: 1, height: 1, label: 'B'},
{id: 'L', x: 0, y: 1, width: 1, height: 1, label: 'L'},
{id: 'M', x: 1, y: 1, width: 1, height: 1, label: 'M'},
{id: 'N', x: 0, y: 2, width: 1, height: 1, label: 'N'},
{id: 'O', x: 1, y: 2, width: 1, height: 1, label: 'O'},
{id: 'P', x: 0, y: 3, width: 1, height: 1, label: 'P'}
];
var items2 = [
{id: 'C', x: 0, y: 0, width: 1, height: 1, label: 'C'},
{id: 'D', x: 1, y: 0, width: 1, height: 1, label: 'D'},
{id: 'E', x: 2, y: 0, width: 1, height: 1, label: 'E'},
{id: 'F', x: 3, y: 0, width: 1, height: 1, label: 'F'},
{id: 'G', x: 4, y: 0, width: 1, height: 1, label: 'G'},
{id: 'H', x: 5, y: 0, width: 1, height: 1, label: 'H'},
{id: 'I', x: 0, y: 0, width: 1, height: 1, label: 'I'},
{id: 'J', x: 1, y: 1, width: 1, height: 1, label: 'J'},
{id: 'K', x: 2, y: 1, width: 1, height: 1, label: 'K'}
];
var grid1 = $("#grid1").data('gridstack');
var grid2 = $("#grid2").data('gridstack');
items1.forEach(function (node) {
grid1.addWidget($('<div><div class="grid-stack-item-content">'+node.label+'</div></div>'),
node.x, node.y, node.width, node.height, false,1,3,1,3,node.id);
});
items2.forEach(function (node) {
grid2.addWidget($('<div><div class="grid-stack-item-content">'+node.label+'</div></div>'),
node.x, node.y, node.width, node.height, false,1,3,1,3,node.id);
});
$("#showInfo").click(function() {
var items1 = $("#grid1").data('gridstack').grid.nodes;
var items2 = $("#grid2").data('gridstack').grid.nodes;
console.log(">>> widgets ");
items1.forEach(function(item){
console.log(item);
if( item.id ) {
console.log(item.id +' '+item.x +' '+item.y +' '+item.width +' '+item.height);
}
else {
itm = item.el.data();
console.log(itm.gsId +' '+itm.gsX +' '+itm.gsY +' '+itm.gsWidth +' '+itm.gsHeight);
}
});
console.log(">>> dashboards ");
items2.forEach(function(item){
console.log(item);
if( item.id ) {
console.log(item.id +' '+item.x +' '+item.y +' '+item.width +' '+item.height);
}
else {
itm = item.el.data();
console.log(itm.gsId +' '+itm.gsX +' '+itm.gsY +' '+itm.gsWidth +' '+itm.gsHeight);
}
});
});
$(document).on('click', '.grid-stack-item', function() {
console.log('grid id : ' + $(this).parent().attr("id"));
console.log('widget id : ' + $(this).attr("data-gs-id"));
});
});
</script>
</body>
</html>
- jQuery checkbox 전체 선택/해제 예제 2022년 3월 15일
- Highcharts error #17 2019년 7월 10일
- Highchart TypeError: c.init is not a function 2019년 7월 10일
- Highchart 크기 조정 2019년 7월 8일
- Highcharts error #13 2019년 7월 8일
- Grid Stack Two grids demo 예제 2019년 6월 12일
- 동적으로 추가/생성된 태그에 이벤트 추가 방법 2019년 6월 10일
- Highcharts update event 2019년 3월 26일
- jdom2를 이용한 spring xml response(응답) 2017년 12월 5일
- jquery xml 요청, spring xml 리턴 2017년 12월 5일
- jquery div show hide 예제 2016년 5월 25일
- jquery css 예제 2016년 5월 25일
- jquery selectbox 예제 2016년 5월 25일
- jquery json 예제 2016년 5월 25일
- jquery template 예제 1 2016년 5월 25일
- jquery datepicker 2016년 5월 9일
- jquery radiobox 2016년 4월 29일
- jquery bgiframe 정리 2016년 2월 1일
- jquery each( $.each ) 2016년 1월 25일
- jquery spring – checkbox로 선택된 배열 주고 받기 2015년 8월 15일
- jquery spring ajax call 2015년 8월 15일
- jQuery 동적 체크박스 제어 2015년 1월 27일
- 간단한 jquery chained selectbox 예제 2014년 12월 4일
- jquery ui tip 2014년 9월 2일